
If you’ve ever found yourself with dimples in your epoxy job, don’t worry – there’s an easy fix! All you need is a little bit of heat.
Set your oven to its lowest temperature setting. Then, place the item that has dimples on a baking sheet and put it in the oven for about 15 minutes. This will help to soften the epoxy so that you can easily smooth out the dimples with a putty knife or other flat object. Just be careful not to overheat the epoxy, as this can cause it to become brittle and break.
In this blog post, we’ll show you how to fix dimples in your epoxy job so that you can get the perfect finish, along with what causes this problem.
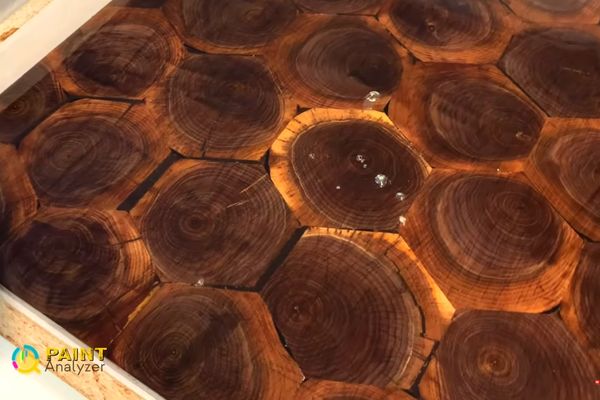
What Causes Dimples On Epoxy?
When you mix epoxy, you may notice that it starts to form a dimple in the center of the mixture. We figure out a few reasons for this to happen:
Improper Mixing
When mixing epoxy, it is important to take care to ensure that the mixture is properly combined. If the mixture is not properly mixed, the chemical reaction may not be complete, resulting in a weaker mixture. This can cause the mixture to form a dimple, which can weaken the overall structure.
Contamination
If the epoxy is contaminated, it can also cause the mixture to form a dimple. Contamination can occur if the epoxy is not mixed in a clean environment or if the mixing utensils are not clean. If the epoxy is contaminated, it may not cure properly, which can cause the mixture to form a dimple.
Temperature
The temperature can also affect the curing process of epoxy. When the temperature is too low, the epoxy will not cure properly and may form a dimple. Conversely, if the temperature is too high, the epoxy may cure too quickly, which can also cause the mixture to form a dimple.
Improperly Cured Epoxy
If the epoxy is not cured properly, it can also cause the mixture to form a dimple. When the epoxy is curing, it produces heat through a chemical reaction. When the epoxy is not cured properly, the chemical reaction may not be complete, and the epoxy will not be as strong as it should be. This can cause the mixture to form a dimple. Normally old or expired epoxy will cause this to happen.
All of these factors can cause the epoxy to form a dimple in the center of the mixture. If you notice a dimple in your epoxy, it is important to determine the cause so that you can take steps to correct it.
How To Easily Fix Epoxy Dimples?
Epoxy dimples are those small, raised bumps that can form on the surface of an epoxy coating. Entrapped air bubbles cause them, and while they may not seem like a big deal, they can actually cause your epoxy coating to fail. Here are some tips on how to fix epoxy dimples:
Method 1: Use Heat
You can use a propane torch or a heat gun to heat the area with the dimples. This will help to release the air bubbles and when the bubbles appear, pop them with a needle. Afterward, apply a new layer of epoxy if needed.
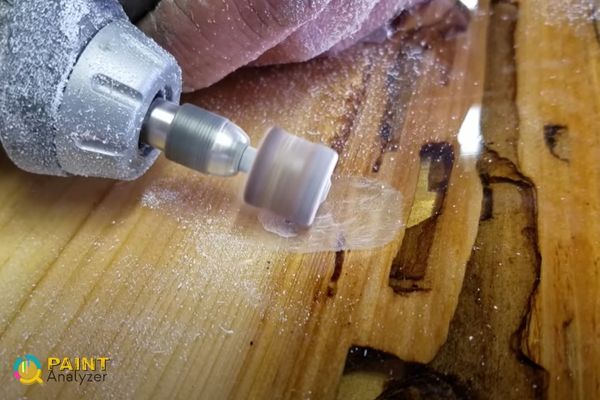
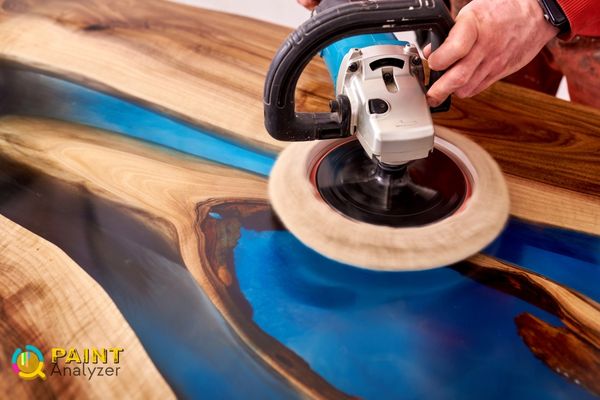
Method 2: Use a Sander
You can use a sander if the dimples are too small or too many to remove with a propane torch. First, sand the area with the dimples using 100-grit sandpaper. Then, switch to finer sandpaper, like 200-grit, and sand the area again. Finally, apply a new layer of epoxy.
Method 3: Baking In Microwave
It is one of the quickest ways to remove dimples. Put the object in the microwave and heat it for 30 seconds. After that, take it out and use a needle for popping the bubbles. Let it cool down, and apply a new layer of epoxy.
Method 4: Use a Vacuum Chamber
This method is for those who have access to a vacuum chamber. After applying the epoxy to the surface, put the object in the vacuum chamber and remove all the air. This will help to avoid the formation of dimples. After that, cure the epoxy according to the manufacturer’s instructions.
These are some effective methods on how to fix epoxy dimples. Remember applying a new layer of epoxy is always best after fixing the dimples to achieve a smooth and consistent finish.
Can Using a Paint Mixer on a Drill Help Fix Dimples in an Epoxy Job?
Using a paint mixer stirrer on a drill can definitely help fix dimples in an epoxy job. The spinning motion of the mixer stirrer can effectively blend and smooth out any imperfections in the epoxy, resulting in a more even and professional-looking finish.
What Happens If You Don’t Fix Epoxy Dimples?
Dimples on epoxy are a common issue while working with the material. Many factors, like incorrect mixing ratio, incorrect temperature, and contamination, can cause it. But you may be thinking that it’s not a big deal and ignore it. Well, here’s what happens if you don’t fix those dimples on your epoxy project.
The dimples will eventually cause the epoxy to crack and fail. The cracks will start small but will eventually get bigger and cause the epoxy to break apart completely. So, fixing those dimples is important before they cause any serious damage.
If the dimples are small and not too many, you may be able to get away with not fixing them. However, fixing them will just be a cosmetic issue and won’t affect the strength or durability of the epoxy. But, if the dimples are large or there are a lot of them, then it’s best to fix them so that your epoxy will last.
How TO Fix Epoxy Dimples On Tumbler?
Conclusion
In conclusion, dimples in the epoxy project are a common issue. Small and few dimples might not be a big issue. But too many dimples will affect the beauty and function of the project. Dimples happen because of improper mixing, temperature, and contamination. The best way to avoid dimples is to be careful when mixing and applying the epoxy.
When it’s about fixing them, small dimples can be sanded down after the epoxy has cured. If the dimples are too many or too deep, you might need to remove all the epoxy and start over again.
